Monday, April 23, 2012

Peanut-butter-aholic...

I have two confessions to make.  First, I am addicted to peanut butter.  Completely and utterly obsessed with it. I eat it every day.  As a sandwich, off the back of a spoon, smeared on a piece of cheddar cheese, it doesn't matter.  Creamy, crunchy, honey roasted...it's all heavenly. I can often be found late at night, standing in front of the open refrigerator, eating it straight from the tub.  My second confession is a bit more embarrassing than my first (hard to imagine something worse than the image of me, in my pjs, with peanut butter smeared on my chin and knuckles, but it's true).

I am a peanut butter snob.  There.  I said it.  Out loud...well, on the internet anyways.

I turn my nose up at the impostors on the grocery store shelves that have the audacity to call themselves peanut butter.   I sneer when I see ingredients like sugar and corn syrup at the top of an ingredient list for this food of the gods.  Peanut butter should contain two things and two things only.  Peanuts.  Salt.  That's it.  Now, in my defense, this attitude isn't entirely my fault.  I ate a lot of pb & j's growing up and the only peanut butter we ever had in the house was the all natural kind that had to be kept in the fridge.  It had a weird layer of fat on the top that had to be mixed in, but once it was.....mmm, delicious! Natural peanut butter has come a long way since then...now you don't have to stir in a fatty layer of goo!  So, I guess I have my mom to both blame and thank for this attitude of snobbery towards all other peanut butter products....so THANKS mom!

I love adding peanut butter to baked goods.  It makes a great addition to cookies, cupcakes, and bars and can even be the star of a pie or mousse.  I wanted to share a ridiculously easy recipe for flourless peanut butter cookies that I hope you and yours will enjoy as much as my family always does!

Flourless Peanut Butter Cookies with Chocolate Chips

  • 1 cup peanut butter (any brand will do...I don't expect the world to be as snooty as me)
  • 3/4 cup brown sugar
  • 1 egg
  • 1 teaspoon vanilla extract
  • 1 teaspoon baking soda
  • 1/2 cup mini chocolate chips
Preheat oven to 350 degrees.

Combine first 5 ingredients in a bowl. Mix in the chocolate chips.  This mixture will be coarse in appearance.  

Using wet hands, form the dough into balls, about a tablespoon in size, and place on an ungreased cookie sheet about 2 inches apart.  Bake cookies for 10 minutes and allow to cool on cookie sheet for an additional 5 minutes before placing them on a cooling rack to cool completely.


Friday, April 20, 2012

Bananas in pajamas

Do you have a certain song in your head right now, about a certain fruit marching down the stairs in their pj's? I sure do.  If you don't, you're lucky.  But really I am the lucky one because this morning I got to enjoy banana chocolate chip muffins, fresh from the oven, while wearing...you guessed it, my pajamas!

Now, you put chocolate on something and I am THERE.  Bacon, apples, heck, I would probably eat a brussel sprout if was dipped in melted chocolate....maybe.  Bananas and chocolate are a no brainer combination and while everyone and their mom has a recipe(s) for a tasty baked goodie with these two classic ingredients, the one I am going to share with you is a little different.  It's wheat free.  Please do not confuse this with gluten free.  I will spare you a food science lesson (for now) but just know that they are not the same and I will always tell you if a recipe is free of gluten or wheat (or if it contains the above mentioned chocolate covered brussel sprout...because frankly that's just nasty).

Here it is....

Banana Chocolate Chip Muffins
Makes 18 regular sized muffins

  • 2 very ripe bananas
  • 2 frozen bananas 
  • 1/2 cup brown sugar
  • 1/2 cup agave nectar
  • 1 egg, lightly beaten
  • 1/4 cup buttermilk
  • 1 1/2 cups Spelt flour*
  • 1 teaspoon baking soda
  • 1/4 teaspoon salt
  • 1/3 cup mini chocolate chips
Preheat oven to 350 degrees and line muffin cups with liners or coat them with cooking spray.

Place the 2 frozen bananas on a plate and defrost them in the microwave for 3-4 minutes or until they are squishy inside, but not liquified.  Chop up the reaming 2 bananas into roughly 1/2 inch cubes.


In a small bowl whisk together flour, baking soda, and salt.  Set aside.

Combine brown sugar and agave nectar in a mixing bowl and stir with a spatula until combined.  Add buttermilk and egg to sugar mixture and stir until combined.  Add diced and frozen bananas to this mixture and mash together with a fork or potato masher.  (To add the frozen bananas, just cut off the stem end of the banana and squeeze the banana into the bowl)


Next, add the flour mixture to the banana mixture and fold until just combined and then fold in the chocolate chips.


Divide batter between muffin cups and bake for 18-22 minutes or until tops are lightly browned and toothpick inserted into center of a muffin comes out clean.  Remove from pan immediately and place on rack to cool.

Before...

...after!


Store in an airtight container for up to a week...they lasted 3 days at my house, and none of us waited for them to cool before we dug in!

*Spelt is considered a cereal grain and is a member of the wheat family.  It does contain gluten but it is much more fragile than the gluten in wheat flour so it is very important not to overmix when being used in baked goods.  You can substitute all purpose flour in the same amount for this recipe for virtually identical results, both in flavor and texture. So I lied.  Mini food science lesson.  Sorry.


Monday, April 16, 2012

A little rambling...and some gluten free lemon bread

To say baking is a passion for me would be an understatement.

I love to bake.  Seriously.  Love it.

I lay awake at night thinking about attempting macaroons for the first time.  I am making mental notes about new flavor combinations for doughnuts while I blow dry my hair and I am usually fantasizing about opening a bakery when I drive into work.  So yeah, I have baking on the brain. Lately I am also constantly trying remake old recipes and create new ones that are gluten free but don't taste like it. We aren't strictly gluten free at our house but I try to be as much as possible because I just feel better when I am.  Crazy, but true.

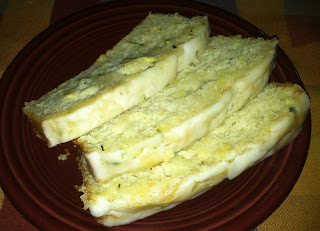
This post is one of those gluten free attempts and I must say, I was pretty pleased with the results.

Please don't judge me by these photos.  A photographer I am CLEARLY not and these are from my cell phone camera.  I will try to do better in the future...but I might just be saying that.  Time will tell.

Gluten Free Glazed Lemon-Zucchini Bread
adapted from Lemon-Zucchini Loaf with Lemon Glaze @ nancycreative.com

  • 2 cups self rising gluten free flour blend*
  • 2 eggs
  • 1 egg white
  • 1/2 cup canola oil
  • 2/3 cup sugar
  • 1/2 cup buttermilk
  • juice of 1 lemon
  • zest of 1 lemon
  • 1 cup shredded zucchini
Preheat oven to 350 degrees.  Grease and flour or use cooking spray to prepare a 9x5" loaf pan.

In a medium bowl or the bowl of a stand mixer beat the eggs and egg white for 1-2 minutes.  Add the oil and sugar and continue mixing for another minute.  Then add the buttermilk, lemon juice and lemon zest and mix until fulling incorporated.

Fold in zucchini to the wet ingredients and then gently fold the dry ingredients into the wet until just combined.

Pour batter into prepared pan and bake for 40-45 minutes or until top is starting to lightly brown and toothpick inserted into center of loaf comes out clean.


Cool in pan for 10 minutes then remove from pan and place on cooling rack.


While the loaf cools in the pan, it's time to make the glaze.  Glaze...fancy word for a thinned out frosting.  In my world, frosting makes most things better. Whoever coined the phrase "icing on the cake" really new what was up.

Lemon Glaze

  • 1 cup powdered sugar
  • juice of 1 lemon
Combine sugar and lemon juice in a bowl and whisk until all lumps are gone.  If you prefer a more "frosting-like" consistency, add a little more sugar.  If you want to thin it out or pack a real lemon punch, add a little more juice.

After you have made your glaze and removed the loaf from the pan, use a toothpick or a skewer and poke holes all over the loaf, being careful not to poke through the bottom.  Take a pastry brush (I used a silicone one) or a spoon and spread about 1/3 of the frosting on your loaf.  Those little holes will allow some of the icing to ooze into the bread and add flavor and moisture.  Gluten free baked goods often dry out faster (there is a food science explanation for this...I will spare you the details, for today anyways) so this method will hopefully help offset that.  Wait 5-10 minutes and then brush or spoon the rest of your icing onto the loaf.

Lastly, enjoy!


If this bread is around long enough, wrap the fully cooled and glazed loaf in a little plastic wrap and then place in an airtight container.

*Self rising gluten free flour blend is a recipe from www.livingwithout.com and the blend is as follows:
2 1/2 cups sorghum flour (purchased at a local co-op)
2 1/2 cups fine white rice flour (purchased at a local co-op)
1 cup tapioca flour (purchased at a local co-op)
4 teaspoons xanthan gum (purchased at a local co-op)
8 teaspoons baking powder
1 teaspoon salt

Place all ingredients in an airtight container and once lid is secure, shake until fully mixed.  Best results when stored in the freezer.